Our journey with Google Education

Over the last term (Aug-Dec 2017) we’ve made some major changes to the devices and services we use across the school with children. In Jan 2017, I went to BETT and met with Ian Addison, who was kind enough to use the google stand and one of their chromebooks to give me a tour of his school’s set up on Google Suite for Education. I’d been wanting to get back to using google across the whole school for some time but finally the stars aligned and a chunk of capital, school expansion leading to the need to remove our ICT Suite and me being in the very fortunate position of being out of class meant it was possible.

Our ICT Suite was in need of updating but pressure on the space was at a premium and so we decided to free up the room by replacing it with mobile devices spread across the school. I was keen to provide a mixed environment for our children to work in, so chose a combination of ASUS chromebooks and Lynx Windows tablets (with removable keyboards). We set up Google Suite for Education (with lots of help from Google through their education tour last year as well as Ian’s invaluable blog posts) and began this academic year with 60 Chromebooks, 45 Lynx tablets and 2 new storage trolleys.

I’ve been very lucky to be able to deliver the roll out of the devices through teaching computing in our PPA sessions. We work on a two week rota, so each phase has a day out of class together every fortnight (brilliant for collaborative planning and working together as a team). The children have a programme of curriculum enrichment on those days comprising PSHE, dance, sport, computing, French and music. So I’ve had the amazing experience of teaching computing to roughly 360 children (years 1,2,5 and 6) every two weeks. Year 3 and 4 have been taught by my colleagues wormy my support. It’s worked brilliantly and the children’s skills have really developed and the insight I’ve gained into teaching computing has been amazing!

Some key points I’ve learned along the way (in no particular order!)

  • The ASUS chromebooks are a dream to work with. They are super fast, incredible battery life (they last 8.00 am – 3.15pm being used on 6 sessions of 50 min carousel with 180 children without recharging and usually have around 60% battery left!). They are amazingly consistent, behaving in the same way on every device, so I can practise on one and know what I show the children will be exactly the same when they do it.
  • Our Internet is more stable than I thought it would be. I chose to have some windows devices so that we could least have something on regardless of our broadband status. I needn’t have worried, after a few teething troubles whilst we had fibre installed, it’s never been a problem.
  • The windows tablets were cheap but they aren’t a patch on the chromebooks. Logging into google accounts on them can still take some year 6 children 10 minutes, whereas my entire year 1 cohort can turn on and log in in under 2 mins 30 s. This is due to a couple of factors – the chromebooks turn on in a few seconds, it can take the windows tablets 5-8 minutes just to turn on. The domain name is pre-completed on the chromebooks and the log in is the first screen the children see. On the windows tablets, children must open Chrome then go to classroom to log in. Despite numerous attempts by our technicians, some tablets still don’t open on our default homepage which has a short cut to classroom, adding further steps for the children to complete.
  • I picked up a tip on the google ed tour about asking children to close the lids on their devices when you want to talk to them. Sounds obvious but I’ve introduced it across the school and ‘lids down, eyes forward’ is something everyone knows. Once the children realise their work won’t be lost as Google autosaves everything and that the devices come back on instantly at the page they were working on they soon learn to concentrate on my modelling and we all get on much quicker!
  • The Google Education Group on G+ are fantastically helpful and have responded to my badly worded questions with patience, generosity and clarity. Along with hangouts with the wonderful Tim Bleazard and help on twitter, I am always grateful to have access to and the support of the online teaching community.

The next steps for us are now to embed the use of the devices across the school with our teachers taking up the challenge to use them in class.
#exabytes17 Micro:bits and the Iron Man in KS2

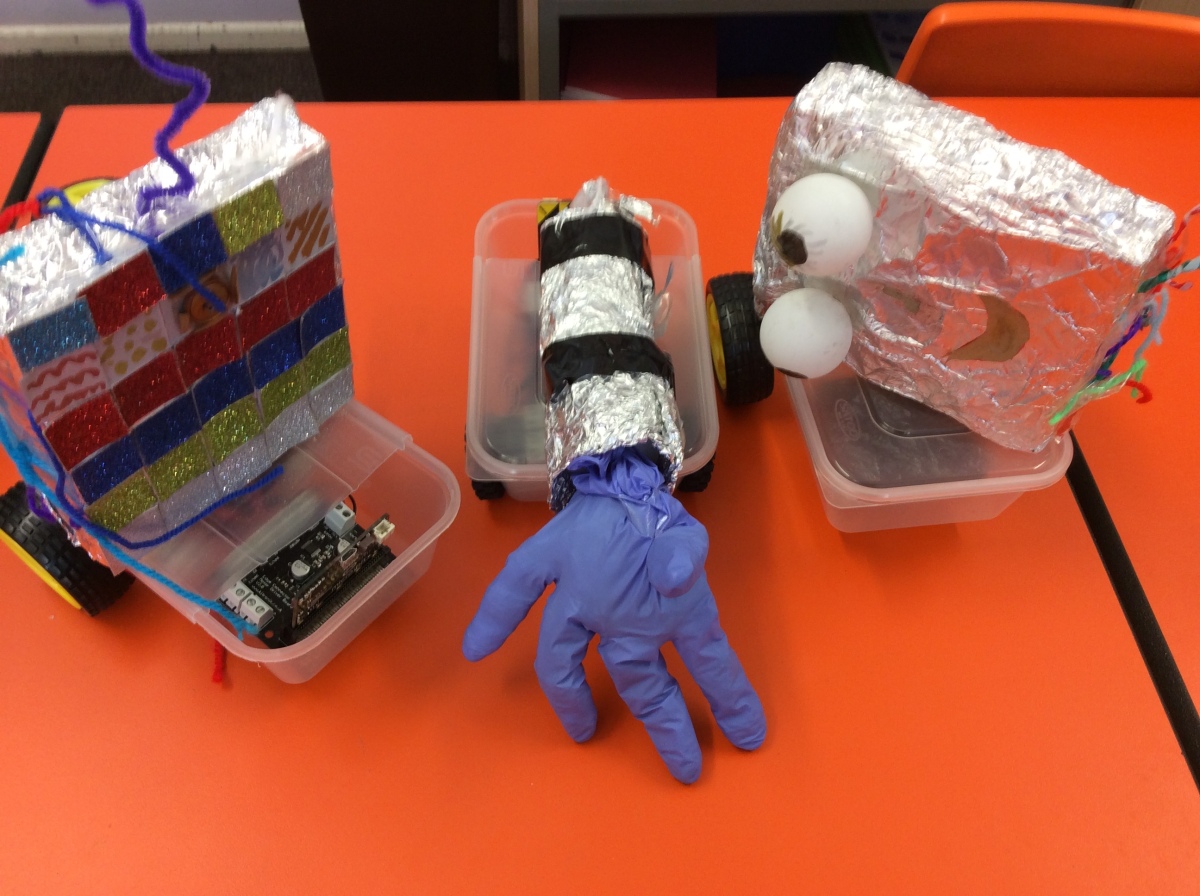
I had the pleasure of presenting at the #exabytes17 conference in Bradford on 7 July 2017. Yvonne Walker and I discussed our CAS Microbit project, making lunch box buggies on an Iron Man Theme! The resources for the project are on the CAS community site (sign up for free to download them all!).

We asked delegates to suggest their own ideas on how to use microbits across the curriculum and express interest in joining the project. Please use the google form if you are also interested!

CAS Annual conference: Using micro-bits across the primary curriculum

Making lunch box buggies with Iron Man body parts!

I was delighted to present the work from our CAS project Using micro-bits across the primary curriculum at the CAS Annual Conference on 17th June 2017. I presented with Yvonne Walker from CAS and demonstrated one of the buggies that we had made as well as letting delegates loose on some microbits.

We asked delegates to suggest their own ideas on how to use microbits across the curriculum and express interest in joining the project. Please use the google form if you are also interested!

Full details of the project and how to get involved:

CAS teacher resources http://community.computingatschool.org.uk/resources/4991

Using a second Microbit as a remote control for the lunch box buggy

A second Microbit to use as a radio control for the buggy.

On Friday, a very large box of Microbits arrived from Kitronik (via BCS who are distributing the Microbits for our CAS project). So I finally had a second Microbit to try out.

First boot

The first Microbit I had was a gift from Yvonne Walker at CAS, so I hadn’t one fresh out of the packet before. I was delighted to discover that once the supplied power pack was attached, the Microbit booted and ran an introductory code. The microbit ‘introduces’ itself and walks you through using the buttons and accelerometer (see Intro to the Microbit from Tech will save us). I will be able to use this for our first lesson using the Microbit, once we have also looked at the safety leaflet and thought about how to handle them safely. (You can re-instate the start-up code from the copy on Tech will save us).

Programming the remote control


Tech will save us has a nice tutorial and code to make a remote control for their buggy. I adapted this code as I had used a different command to control the motors. The remote control Microbit now uses the accelerometer to move the buggy forwards and backwards, pressing button A makes the buggy turn clockwise and button B makes it turn anticlockwise, pressing A+B stops the buggy. The code could do with  some refinements as at the moment, it is a two man job to turn the buggy off! Holding down A+B continuously stops the buggy still, whilst someone else switches the power pack off. I’ve also lost the granularity of control I had before, so that going forwards and back for a set time, and turning clockwise and anticlockwise for a set time to effectively turn 90 degrees has been lost within the forever loop.  So, any suggestions on how I can get that control back and/or how I can make A+B stop the buggy by one press would be really helpful! The code I have so far is shared below (for the PXT block editor).

Microbit lunch box buggy coding

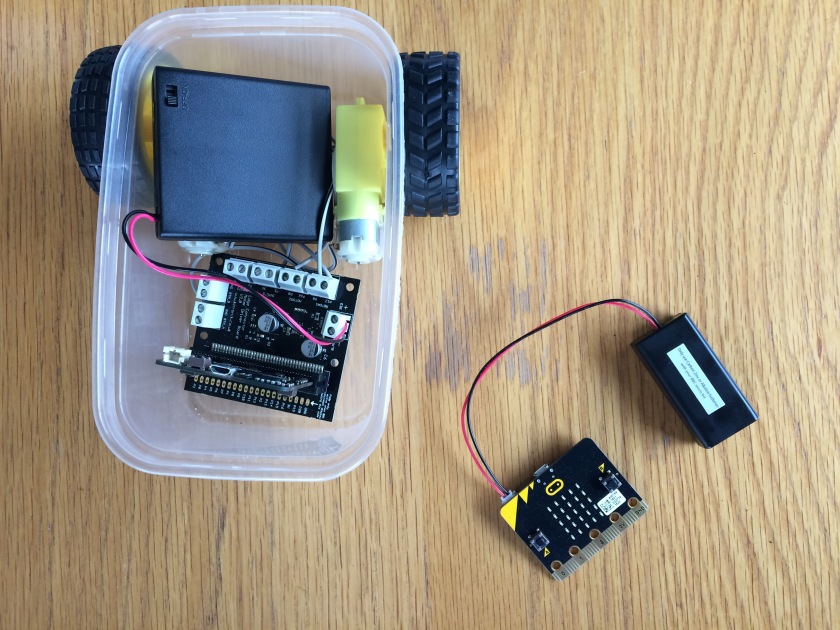
IMG_4973
lunch box buggy

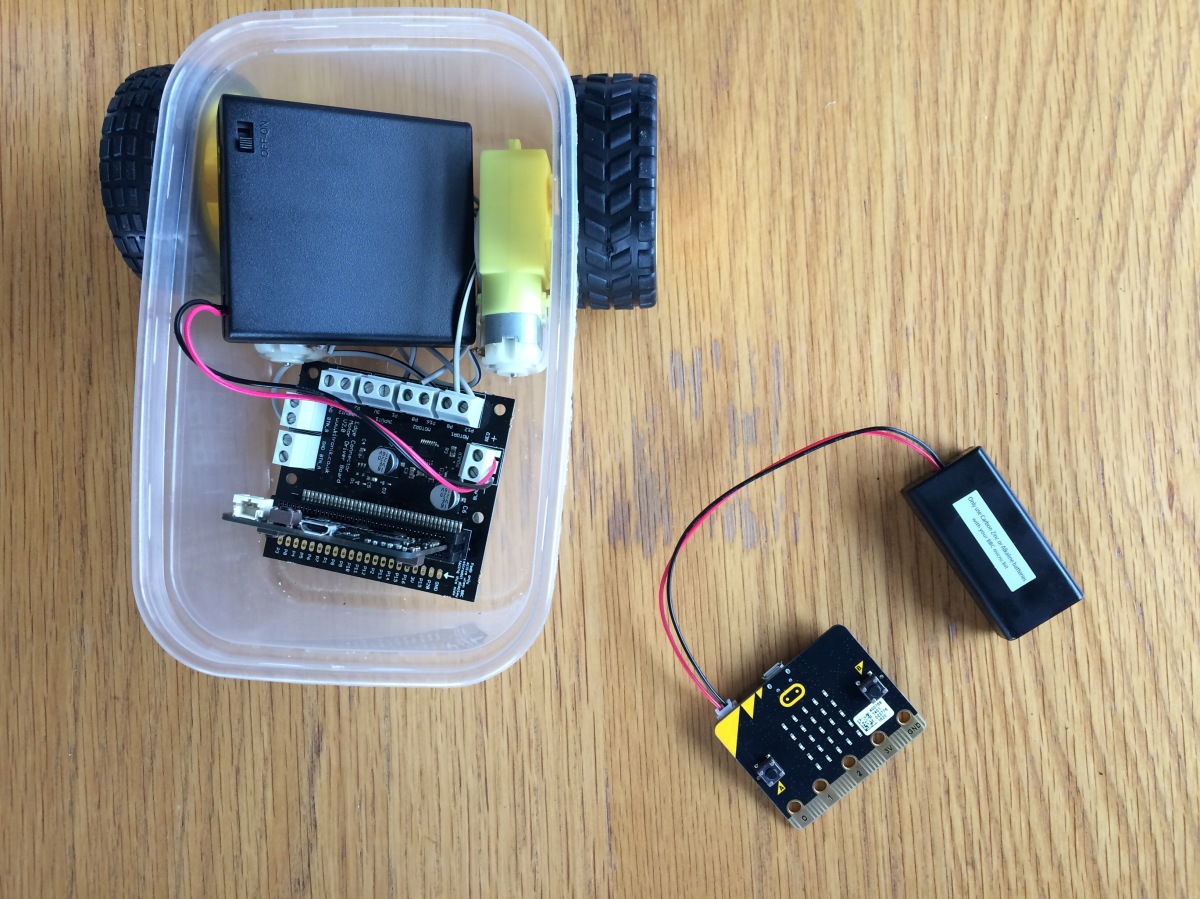
We are building lunch box buggies controlled by Microbits as part of a CAS project. So far, I’ve built two versions of the buggy (one in Lego and one using Kitronik kit) and quickly written some very simple code to make it move forward.

I wanted to have some basic sections of code that our children could tinker with and then put together in a sequence to navigate the buggy around a given course.

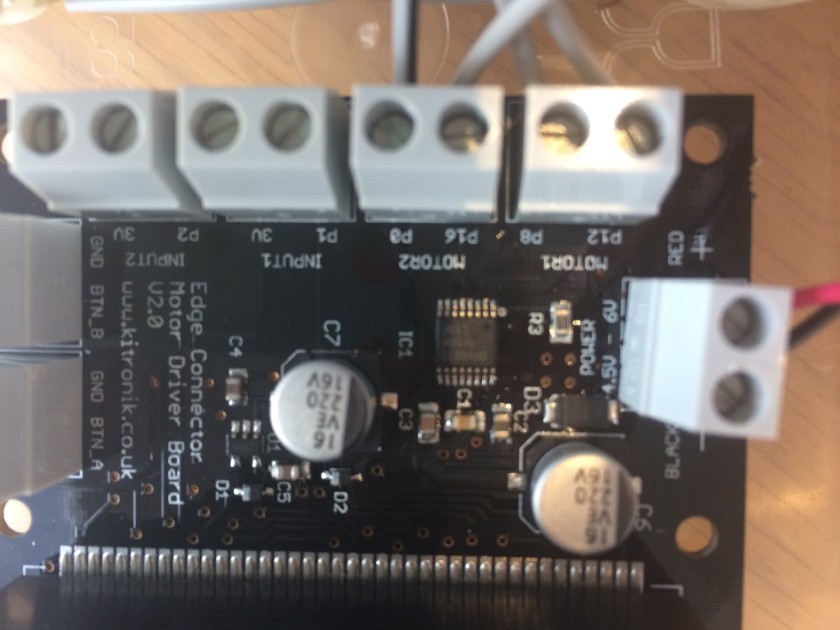
As I understand it, the motor board has four pins that between them can control 2 motors. There are two wires from one motor to the motor board that connect to two pins (i.e.: motor 1 uses PIN12 and PIN8 and motor 2 uses PIN16 and PIN0).

IMG_4975
motor boards and pins
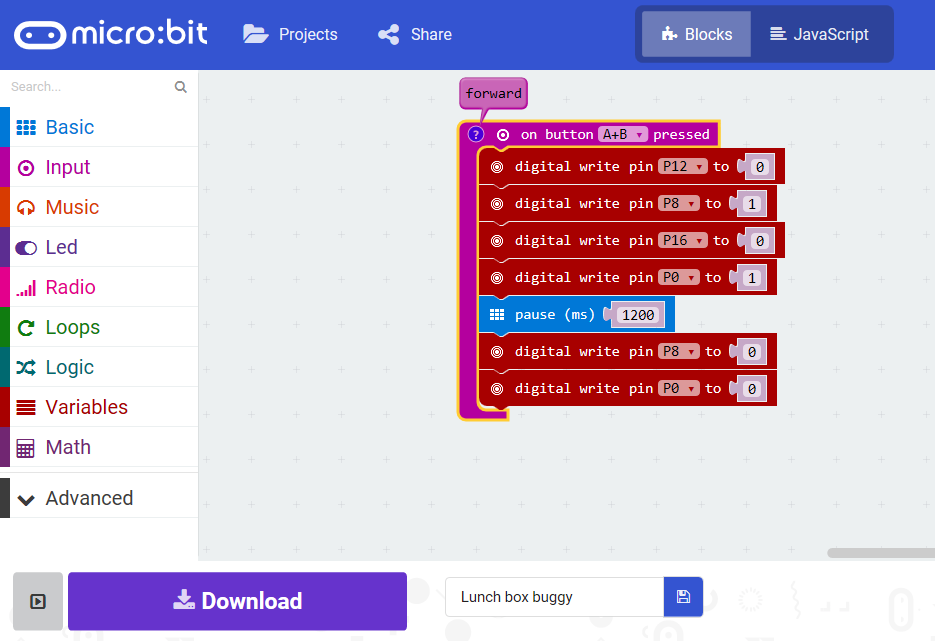
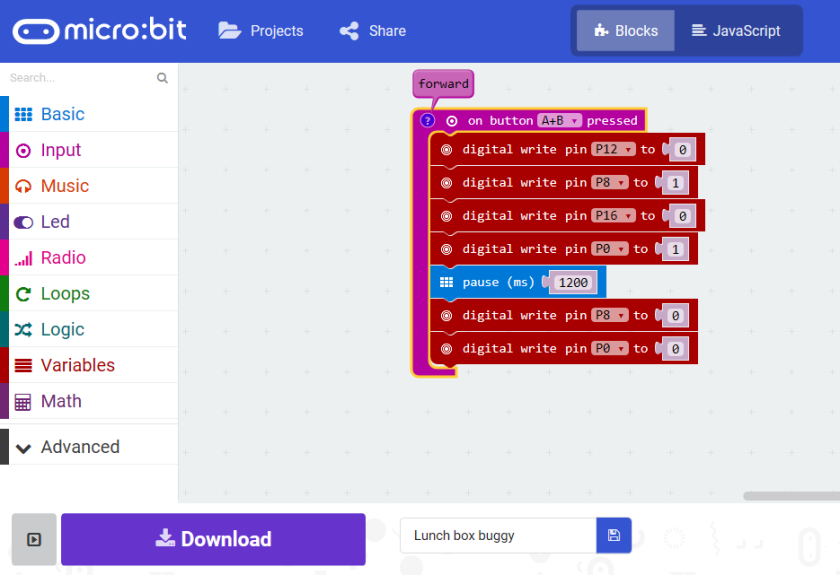
Using the command ‘digital write pin12 to 1’ turns the electricity on to pin12 (on motor 1) and ‘digital write pin12 to 0’ turns the electricity off to pin12. So going forward when both button A+B are pressed looks like this:

forward

After some tinkering and with lots of help from my beloved Husband (who knows his way round Linux and other command line code) and the lovely Lorraine Underwood, we found we could add a comment to label this section of code as ‘forward’ (go to the JavaScript and add a line at the top with ‘// forward’, then back into blocks and the little blue question mark at the top left appears with a comment. We then worked out that by having one motor run forwards the other run backwards, we could turn the buggy in a circle. The tricky part was working how to make it stop, however, once we worked out that once a pin was turned on, it didn’t turn off until set back to 0, we realised that adding a pause then setting the pin back to 0 would run the motor for a set amount of time. After that it was a case of trying different amounts of time to get a quarter turn. Eventually we discovered 1200 ms was about the right amount of time!

I’ve tried the buggy on a few different surfaces at home as the wheels seem to slip sometimes, and the shape of the lunchbox, with slightly sloping sides causes the wheels to be a slight angle. All of this can make the turns slightly more or less than the 90 degree turn I want, but this is something we can debug with code and with the mechanical aspects with the children once we have the final buggies made.

The code I’ve written so far is published online in the PXT editor. Button A turns right (clockwise), Button B turns left (anticlockwise) and A+B makes the buggy go forward.


CAS North Leicester Primary Hub meeting 28 September 2016 eSafety

Penny Patterson shares her wisdom on how to ensure your school meets the new Safeguarding requirement for online safety.

This term we decided to focus on something that many schools will be covering at this time of year, eSafety. The changes to Keeping Children Safe in Education that came into force on 5 September 2016 included more explicit duties for safeguarding with regard to online activities. We were very fortunate to have Penny Patterson (Senior Inspector Quality Assurance with responsibility for Safeguarding, Havering School Improvement Service) present by Skype for our meeting. She went well beyond the call of duty, when after discovering the M25 was closed, she had to divert and deliver the presentation using her phone from her car whilst parked at a garden centre!

Her slides highlight the new requirements succinctly and she has kindly agreed to share them:

penny-slide1
Full presentation available for download


Safeguarding-and-online-safety ppt file

One of the more alarming aspects of her talk was a discussion around sexting, which most of us had felt wouldn’t be an issue we would need to deal with in Primary schools. However, Penny has dealt with two cases involving children in early years and warned us to be aware of the difficulties of dealing with such cases. Unfortunately the strict legal definition of sexting includes the taking and sharing of indecent images, and if children take photographs of what is under their clothes, this can constitute sexting. Fortunately, UKIS have issued guidance on how to proceed if this happens in your school, and how it can be dealt with in a sensible and proportionate way.

Teachers were keen to know how to deal with parents on social media who were not being good role models to their children. Penny advised that they should consider if the children were involved, named or harmed by the online conversations and if they were, then to deal with this as we would with any other safeguarding incident.

We noted with interest the addition of a category of abuse of neglect for parents whose excessive use electronic devices as ‘babysitters’ and for parents who may be ignoring a child through the excessive use of technology themselves (watching their phone instead of their child crossing the road for example).

Finally, Penny gave us some good advice to make sure that we had checked that the filtering and monitoring systems we were using fulfilled the criteria recommended by the DfE (see : Guide for education settings and filtering providers about establishing ‘appropriate levels’ of filtering and monitoring)

The next meetings of the CAS North Leicester Primary hub will take place in March and May 2017. Book your free tickets online.

Teaching children about Creative Commons Licenses to re-use images #oersch15

open
Open – image found on photos for class with automatic attribution http://www.photosforclass.com/

I have always been keen to share ideas about my teaching, and regularly tweet lesson ideas or activities. However, I haven’t gone as far as making the resources I have made available online, partly because I’ve always been wary about its licensing. Although I work in a primary school, I know that I am ultimately employed by the City Council and so the council owns the Intellectual Property Rights for any educational resources I produce in the line of my employment. As an employee I don’t have the automatic moral rights i.e. the right to be named as author on those resources. I know it isn’t something that many of us think about, but with the massive increase in access to shared resources online, it is really is an issue I believe we teachers should begin to embrace. After all, Open Education is a philosophy that is essentially at the heart of teaching – sharing and learning together, building on each other’s work and collaborating to enhance our own teaching and learning.

Fortunately, Leicester City Council has Josie Fraser working for them. She is a leading proponent of Open Education and under her leadership the Council have take the pioneering step of giving permission to all its school employees to share any educational resources they create using a creative commons licence. I feel incredibly proud to be working for such a far-sighted employer and couldn’t miss the opportunity to begin to share my teaching resources more widely under a creative commons licence.

I attended the Open Education Schools Conference in Leicester this January. The first event of it’s kind in the UK, was organised by Leicester City Council in partnership with De Montfort University. 92 attendees from 48 primary, secondary and specialist provision schools took part in the day, as well as representatives from five UK universities. One of the sessions I attended was a workshop by Miles Berry who encouraged us to think in a very practical way about how we could begin to teach primary school children about Creative Commons licenses and the correct re-use of other people’s work. There were some fantastic ideas generated, such as children remixing scratch scripts that had been shared online. I worked with two colleagues, Hannah Boydon and Marieke Guy to plan a half term unit of work to show children how to search for CC licensed images and then use them in a website they built, making sure that they included the correct attribution and a link back to the original image. Marieke was one of the main speakers at the event, and her write up of the day and impressions of Miles’ workshop are on her blog.

The final product is a medium term plan of 6 lessons:

Unit Objectives:

Digital Literacy:

  • use technology safely, respectfully and responsibly; recognise acceptable/unacceptable behaviour

Information Technology

  • use search technologies effectively and be discerning in evaluating digital content
  • select, use and combine a variety of software (including internet services) to design and create content that accomplish given goals, including collecting, analysing, evaluating and presenting information

Overview

The aim of this unit of work is to teach children the principles of copyright compliant searching and accurate attribution of digital content when it is re-used. Children will learn about the ownership of created content and creative commons licences. They will use search effectively to find images that can be re-used and learn to attribute them correctly. They will create a website which combines the images that they have found and combine them with text to explain how other children can search for images to re-use on their own blogs or websites.

I used the lessons myself in the last half term and will be building the websites with my children in the next couple of weeks. I hope that the plans could be adapted to fit into other areas of the curriculum so that the final end product has a real purpose. My children were studying space and we wrote recounts about our visit to the National Space Centre in our English lessons, which we will then turn into websites using the images we found in the computing lessons. The final websites could be recounts, information texts or even instructions on how to search for creative commons licensed images!

Places for children to search for images to re-use

We did hit a few filtering issues while we were trying to search for CC licensed images. We found using Google advanced image search was reliable, but when images were from flickr, they were often blocked by our filters. Some alternatives the children used successfully were: http://www.pics4learning.com/ , http://gallery.nen.gov.uk/ and for clipart https://openclipart.org/. If you are able to use flickr, I would highly recommend using photosforclass.com which uses flickr images that are pre-filtered to provide a pseudo-safe search. The massive advantage here is that with a quick quick, images can be downloaded with an attribution automatically added (like the photo at the top of this post).

Lesson plans

The lesson plans are shared under a  CC-BY 4.0  licence on TES resources. Thanks to Leicester City Council for giving me this freedom!

CC BY 4.0
CC BY 4.0

OER images lesson plan (2015) by Jo Badge, Rushey Mead Primary School, Hannah Boydon, Mayflower Primary school/ Leicester City Council shared under a CC-BY 4.0  licence.

CAS Leicester North Primary hub launch meeting

I am delighted to announce that, along with my Head Teacher, Debra Bailey, I will be leading a new primary focussed CAS hub in Leicester. Computing At School
(CAS)
is a great organisation that aims to promote the teaching of computer science at school. Membership of CAS is open to everyone, and is very broad, including teachers, parents, governors, exam boards, industry, professional societies, and universities.

A CAS hub is a meeting of teachers and lecturers who wish to share their ideas for developing the teaching of computing in their schools, their classrooms and their community.  It is a meeting of like-minded professionals with the general objective of supporting each other and the specific aim of providing (at least) one idea that can be taken and tried in the classroom. These meetings provide:

  • the opportunity for teachers to meet in a relaxed and informal atmosphere
  • to share ideas and resources
  • to receive training, and
  • to gain mutual support from discussing teaching methods with colleagues.

The launch of the CAS Leicester North Primary hub will take place on Wednesday 26 November 2014, from 16:00 – 17:30 at Rushey Mead Primary School, Leicester. The event is free and all you need to do is sign up online for a ticket. We are very excited to have one of the best Primary CAS Master Teachers of Computing , Phil Bagge, giving a presentation by Skype. Phil is a fantastic teacher of computing and delivers inspiring training on Scratch and other areas of the computing curriculum. I attended one of his Scratch courses recently, and was really impressed by the way he made sure that we knew the common misconceptions children could have and how we could deal with them in our teaching. His massive range and depth of experience in teaching computing lessons really shines through. His resources are all available online and provide an excellent way into teaching the computing curriculum with confidence.

CAS Leicester North Primary hub launch meeting programme

16.00 – 16.15  Introduction and Welcome – What is CAS? Why you should join us?

16.15 – 16.45 “How searching the Internet is just like asking your mum where you left something.” – Phil Bagge, CAS regional coordinator, has a strange but remarkably accurate approach to explaining to primary pupils how web searches work. Will your searching experience be the same after his talk?

16.45 – 17.00 refreshments

17.00 – 17.20 Where does the Internet come from?  a practical hands-on activity to use children to demonstrate how the Internet works by Jo Badge, Computing Lead Teacher, Rushey Mead Primary School.

17.20 – 1730 Evaluation and future CPD

This will be a great opportunity to meet other primary teachers and computing subject leaders locally and share some of the ways that we are beginning to implement the new computing curriculum (there will be tea, coffee, biscuits and hopefully cake on offer too!). I hope you will be able to join us!

Online registration for the launch meeting is now open (and it’s free!).

Phil Bagge Course notes: Scratch for programming in the new curriculum

screenshot of scratch
an example of scratch coding

I was very lucky to attend a full day course looking at Scratch programming with Phil Bagge today (29 September 2014).

Slides from Phil’s session are available at http://code-it.co.uk/smc.pdf and all his planning resources are available on his website.

We started by understanding what computational thinking was and some useful definitions of the trickier terms in the new curriculum. Algorithms and abstraction (I loved the example that abstraction is precisely demonstrated by the London tube map), generalisation, decomposition and logical reasoning. Interestingly, our staff had missed out logical reasoning when dividing up the curriculum as they did not understand it all. We discussed this and they saw that actually this was about questioning the children, getting them to predict and evaluate what they do. Once we started talking about it, they realised that actually this was something they, as teachers, would do naturally through their questioning. This is exactly the definition that Phil gave us! It is a skill that needs to be a taught so that children can do it alone as they progress through the school.

A great article on computational thinking By David Barr, John Harrison, and Leslie Conery.

Some lovely posters to display in the ICT suite to illustrate those tricky computing terms.

One of the best things that Phil did was point out the common mistakes and misconceptions children have when he has taught these lessons. To me this was massively valuable, if you know what sorts of mistakes children are likely to make, it helps you deal with them when or before they arise. It also draws your attention to key teaching points. He was also fantastic at modelling exactly how to do things with the children, including silly voices, physical demonstrations and explaining why some of his modelling was so important. Proper meta-teaching!

For KS1 Phil recommends using the Scratch Junior app on iPads. It is free and does sequencing and repeat really well with very little written language and is highly visual.

For younger children, start with scratch 1.4 (drawing is easier for the younger children), then can graduate to scratch 2.0. Lego WeDo is a nice way to integrate physical control with scratch.

We were working with Scratch (we used version 1.4 but you could just as easily use scratch 2.0)

The Scratch projects we worked through from his computer science planning ideas.

1. Smoking car

Top tips for getting started:

  • Always get into the habit of renaming the sprites – so car, not sprite1.
  • Always model moving the blocks carefully to get them to snap together securely, making a big show of the white snap together line that appears under the blocks. It will pay off later when programmes are more complex and make children think more carefully.
  • When selecting a key – make the class read it aloud together, so that chn understand the action. Point out very carefully that the ‘1’ key is on their keyboard! Make a big point of showing the snap together line. Encourage the children to think what they putting together.
  • 10 steps  =  10 pixels
  • Always get children to test what they have done.
  • Use extension tasks for those children who want to experiment and challenge themselves.
  • Steering – use point blocks because they are always up, down, right left (see the drop down arrow to get degrees for angles for left, right etc).
  • Use zoom feature on your data projector to show the elements to the children.
  • Stage – allows you to programme the background. Makes sprite code disappear – it is not lost!
  • Use whiteboards for children to think through their actions – planning a route for a child to draw out how the car can get along the road (arrows and write down the directions – worked much better!).

2. Music Machine

Super way to introduce loops and repeats – fits with music really well and children can see the point of introducing loops to repeat sections of their music. Put one repeat inside another and ask children to explain to a partner what they will hear before they test it.  Can they predict what will happen?

  • Add the random number chooser in to the select instrument and the sounds will change on each play.
  • Import some loop sounds to show how they can be running underneath any other loops you are using.
  • Programme a button that you have drawn to play notes for a set number of beats, including decimals. Great for demonstrating that two tenths are smaller than five tenths! It sounds shorter – relate to a decimal number line.
  • Take actual music notation and provide a code so that children can convert notes to the numbers, show children that there is a difference between crochet and minims. Music notation is the algorithm that you can convert into a programme by decomposing the notation into pitch and timing and finding repeats.

3. Maths quiz

Uses sensing and selection. Make sure children understand the if/=/then/ else. Show some real life examples (if I get a cold then I will start sneezing).

Use variable to create the score. Then model how the score changes (how the variable changes) by having a child hold a pot and put pens inside to represent the score. At the end the child says what the final score is by looking in the pot and counting the pens.

4. Counting machine

A nice way to look using variables in a real life situation. Extensions – can you make it count faster? Count in 2s? Count backwards from 1000? Count in tenths?

Can you make it count to any number you input?

Make a thirty second count down timer to use in the classroom for our tidy up time! Can you make the timer count down from a time chosen by the teacher?

5. Working with variables (perimeter lesson)

Explain what variables are – moods are variable, the weather is variable (changes). Introduce the idea for what might vary in science (temperature).

Teach children that in a multiplication sum a different symbol is needed to replace the ‘x’ (*).

Create a menu that children can choose 1 for a triangle, 2 for a square using if/then and loops.

6. Games – Slug trail

Use the forever loop to keep the slug moving permanently. Make it move more slowly by decreasing the number of steps it travels within the loop. Again, it is a great idea to model this physically with the children by reading out the blocks and moving across the floor.

A handy hint, to get the slug back off the edge of the screen, right-click on the sprite on the bottom of the screen and use ‘show’.

Draw lines using pen down – point out to children that it is more efficient to put the pen down before the loop starts. Ask chn to draw a background with a path for the slug to move along, code the slug so that it if touches the background colour (goes off the path) it makes a horrid noise and says ‘uh oh!’.

Overall, it was a super day. lots of information and practical hands on activities packed in. Clear ideas on progression and really clear modelling of exactly how to teach programming to children.

Leicester Teachmeet #TMLD14 QR codes for paired reading

My presentation for Leicester Teachmeet on 18 March 2014 at CrownHills School, Leicester. This was based on a teachtweet video I made earlier this year. I added a little extra about teaching algorithms too.

Livestream recording of the teachmeet now available thanks to Leon @eyebeams

This was an idea that David Mitchell described that he used in school, I tried it this autumn, and it worked really well!

QR codes and paired reading

During daily guided reading with my year 4 class, which I run as a carousel of activities, my children can use the class iPad on a rota. A different pair of children each day get to use the iPad with a focussed task. During the first half term of the school year, their task was to find a book from our year 1 classroom and record themselves reading it (with good expression!) using Audioboo (a free sound recording app).  They photograph the cover of the book and publish the recording. The Audioboo recording is set to publish directly to our class blog (in Audioboo settings set to publish to your blog). We then make a QR code to link to the blog post and print out a copy. The paper QR code is stuck into the book and placed back in the year 1 classroom. The year 1 children can use their class iPad to scan the QR code and listen to the story book being read aloud.

Example – Where’s my teddy? Read by Eden and Lewis.

screenshot of blog post audioboo player

Slides on Google

links:

Audioboo app: https://itunes.apple.com/gb/app/audioboo/id305204540

QR code reader app https://itunes.apple.com/gb/app/qr-reader-for-iphone/id368494609?mt=8

QR stuff screenshot: http://www.qrstuff.com/

iPad image http://en.wikipedia.org/wiki/IPad_Mini

Audioboo image http://farm9.staticflickr.com/8096/8545410166_5e15c53777_z.jpg

Algorithms

I will soon be changing schools, starting at Rushey Mead Primary school as ICT lead after Easter. I am very much looking forward to the challenge and for my interview lesson I taught a group of year 5 children how to write an algorithm. The main idea was to show that although the new ICT curriculum has a lot of technical language in it, some of it can be taught from what teachers already know how to do well. Algorithms are basically instructions. I used padlocks and a mixed set of keys to get the children to write some instructions on how to choose a key to open the padlock. They included a decision (does the key fit?) to make the change from simple instructions to become an algorithm.

I was directed (by lots of lovely people on twitter) to several great resources whilst researching the lesson:

Phil Bagge’s Code it.

A treasure trove of planning, ideas, videos and very practical help for anyone worried about the new computing curriculum. If you haven’t seen sandwich bot, you are missing a treat!

Computer science unplugged

Teaching computing without a computer. Does what it says on the tin 🙂

This started me thinking about cross curricular links, with maths and science. I’ve started to work computing language into my maths lessons, to get children to realise the connections between sorting and maths. We were playing 20 questions to guess a number (is it odd? does it have 3 digits?) and I pointed out that Google search works by a process of sorting that many of the children resorted to. They realised that if they knew it was a 3 digit number, they could ask if it was bigger than 500 and narrow down the search options quickly, by picking the mid point to ask about each time (is it bigger than 250?). Branching databases in science are another perfect opportunity to link to computing.