Microbit lunch box buggy coding

IMG_4973
lunch box buggy

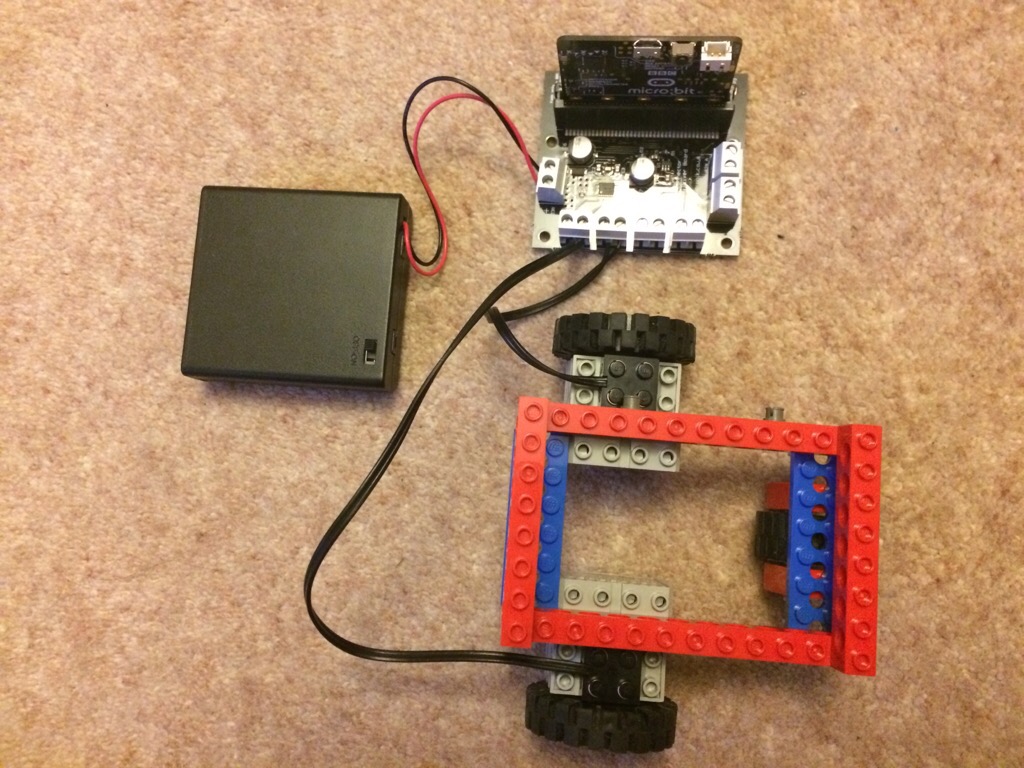
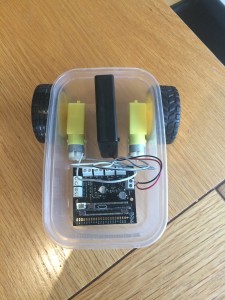
We are building lunch box buggies controlled by Microbits as part of a CAS project. So far, I’ve built two versions of the buggy (one in Lego and one using Kitronik kit) and quickly written some very simple code to make it move forward.

I wanted to have some basic sections of code that our children could tinker with and then put together in a sequence to navigate the buggy around a given course.

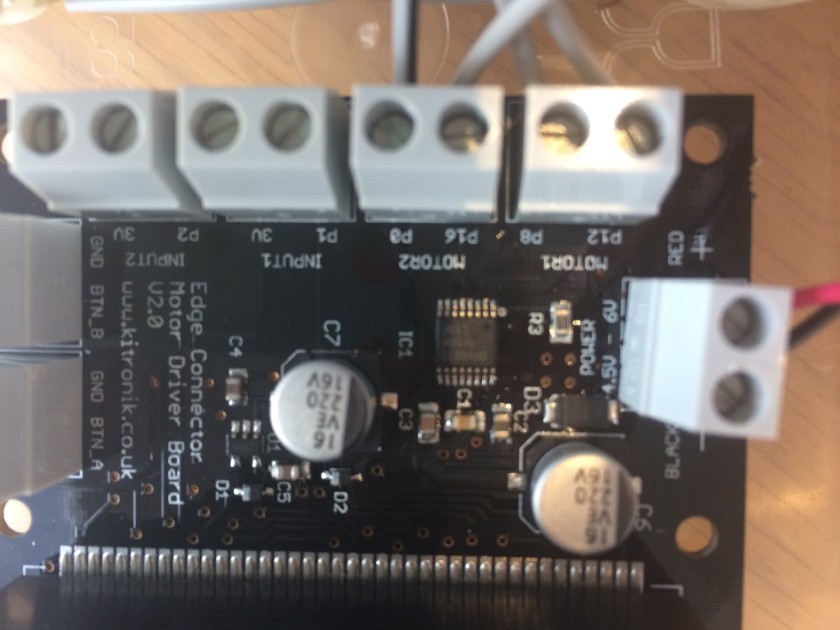
As I understand it, the motor board has four pins that between them can control 2 motors. There are two wires from one motor to the motor board that connect to two pins (i.e.: motor 1 uses PIN12 and PIN8 and motor 2 uses PIN16 and PIN0).

IMG_4975
motor boards and pins
Using the command ‘digital write pin12 to 1’ turns the electricity on to pin12 (on motor 1) and ‘digital write pin12 to 0’ turns the electricity off to pin12. So going forward when both button A+B are pressed looks like this:

forward

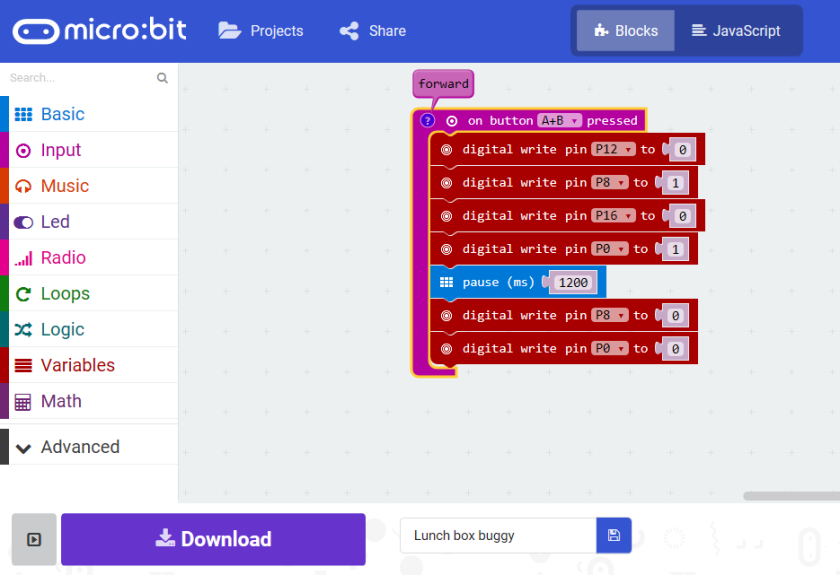
After some tinkering and with lots of help from my beloved Husband (who knows his way round Linux and other command line code) and the lovely Lorraine Underwood, we found we could add a comment to label this section of code as ‘forward’ (go to the JavaScript and add a line at the top with ‘// forward’, then back into blocks and the little blue question mark at the top left appears with a comment. We then worked out that by having one motor run forwards the other run backwards, we could turn the buggy in a circle. The tricky part was working how to make it stop, however, once we worked out that once a pin was turned on, it didn’t turn off until set back to 0, we realised that adding a pause then setting the pin back to 0 would run the motor for a set amount of time. After that it was a case of trying different amounts of time to get a quarter turn. Eventually we discovered 1200 ms was about the right amount of time!

I’ve tried the buggy on a few different surfaces at home as the wheels seem to slip sometimes, and the shape of the lunchbox, with slightly sloping sides causes the wheels to be a slight angle. All of this can make the turns slightly more or less than the 90 degree turn I want, but this is something we can debug with code and with the mechanical aspects with the children once we have the final buggies made.

The code I’ve written so far is published online in the PXT editor. Button A turns right (clockwise), Button B turns left (anticlockwise) and A+B makes the buggy go forward.


Reviving our Lego Mindstorms with Microbits

Using Microbit with Lego Mindstorms technic Lego in primary computing.

Like many schools we have equipment that was bought, well used by a couple of teachers and then they left, the focus on the curriculum changed and the equipment began to languish unloved and gather dust in a corner. We have several sets of Amusement Park Lego Mindstorms For schools (RCX1.0 controller, set number 9725) that haven’t been out of the box in at least the last three years (though the dust on the top of the boxes suggested and the fact that the sets were first released in 1998 leads me to suspect it may have been much longer!). 


Whilst the Robolab software and the drivers can be made to work with Windows 10 (the original requirements were for Windows 95 – bless), I felt it was time to try something different. 

As part of a CAS cross-curricular project to use Microbits with our year 4 children, we are building lunchbox buggies. We have some kit to build buggies but in an effort to give as many children as possible a hands-on experience, whilst not spending any money, I turned to our old Lego kits. 

The Lego motors are more powerful than the hobby motors we used from our buggy kit, but I kept the power pack (4×1.5V AA batteries) and the motorboard the same and hoped for the best! 


I cut off one end of the Lego wire connectors, split and stripped back the wires and connected them to the motorboard. 


I built a very simple frame and balanced the board, Microbit and power pack on top and switched it on and to my delight it worked!


So we will be sacrificing a set of Lego connectors but gaining a new set of resources at no cost to make more buggies. This will also allow us to offer two different ways of building buggies. Whilst the Lego one is perhaps more familiar, building the frame will be more of a challenge than using the lunch box and there is more physical dexterity and care needed to attach the wires to the motors when not using the Lego connectors. 

So if you have some old technical Lego gathering dust dig it out and give it a go!