Iron Man Micro:bit buggies in action!

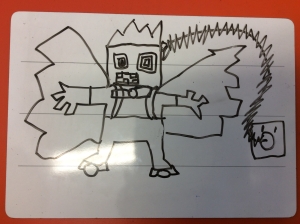
This week I have had the pleasure of working with three year 4 classes in our school to build our Iron Man Microbit buggies as part of our CAS project. Children have been learning about Ted Hughes’ Iron Man story in English lessons and so we started with discussing what the Iron Man would look like.

Children's drawing of the The Iron Man
The Iron Man
We then discussed the parts he was broken up into and children chose a body part to make which would later go on top of their buggy.  Children worked in groups to use junk to make their models.

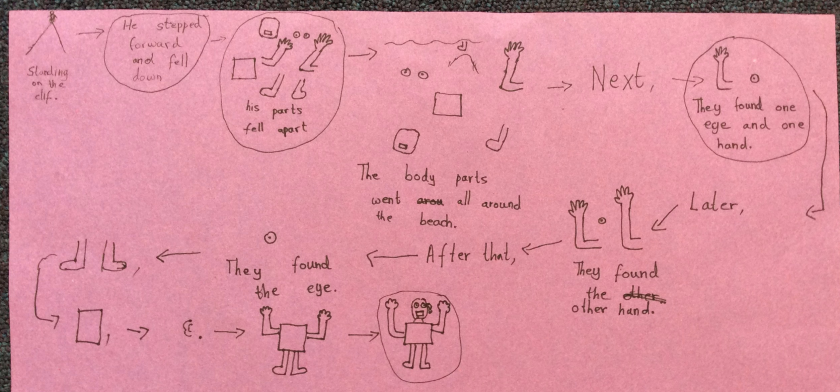
Next they created maps for the different parts of the Iron Man to move across and meet in the middle to begin to reassemble him back  into an Iron Giant! Three groups worked together on each map, so that there were 3 body parts to get together. Some maps were 3-D with added ice-cream shops on the beach, boats in the sea and trees back on the hills behind the cliff, others were more simple and children focused on carefully measuring and mapping their route.

The children had two lessons introducing them to the microbits. First, we looked at the safety leaflet and linked this to the learning we had already done in Science on electricity. The children applied their science knowledge really well and could give good explanations of why water was not safe to have near the microbits. They were delighted when we then plugged them into a battery pack to play the start-up demo game that the microbits come shipped with (copies of the code are available so you can ‘reset’ the microbits if multiple classes are using them for the project).

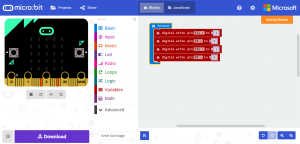
In the second lesson, we talked and learned about input and outputs of various forms. We then used the ‘getting started tutorial’ on the JavaScript Blocks Editor (PXT) to work through coding different writing to be displayed when button A was pressed, and to generate a random number when the microbit was shaken. Some children took it further once they had discovered the ‘input’ blocks and had a response for every input!

We then spent a whole day focussing on building the buggies. We started by looking at the Barefoot computational thinking concepts and approaches to learning and sorted these according to whether the children understood the words or had not come across them. We learned what all the words meant and thought of examples together of how they might apply outside computing (they were all familiar with the analogy that algorithms are instructions like recipes), so for example, we can use Logic to predict what might happen in a story.  The terms were quite difficult for our children, especially as the large majority have English as an Additional Language. However, we kept referring to them throughout the day, prompting children to start using the language as they worked. They soon began to recognise when they were using logic to predict which part of their buggy might be broken.

We started by drawing a text map of the first chapter of the Iron Man and then showing how this was an algorithm to tell the story in a sequence and that we had decomposed the story into parts. I then challenged the children to abstract the key parts of the story, choosing just four steps to retell the most essential plot points. This helped them to understand how abstraction was the process of removing unnecessary detail.

story map
Story map showing abstraction by choosing 4 key elements of the plot to retell the story in the fewest of steps.
Next we built the buggies. Children worked in groups of 3 and we followed the instructions together as a class, helping each other to solve problems along the way. Clear photographic instructions helped, as did using a visualiser to show how some of the more fiddly parts were done (e.g. attaching wires to the motorboard).

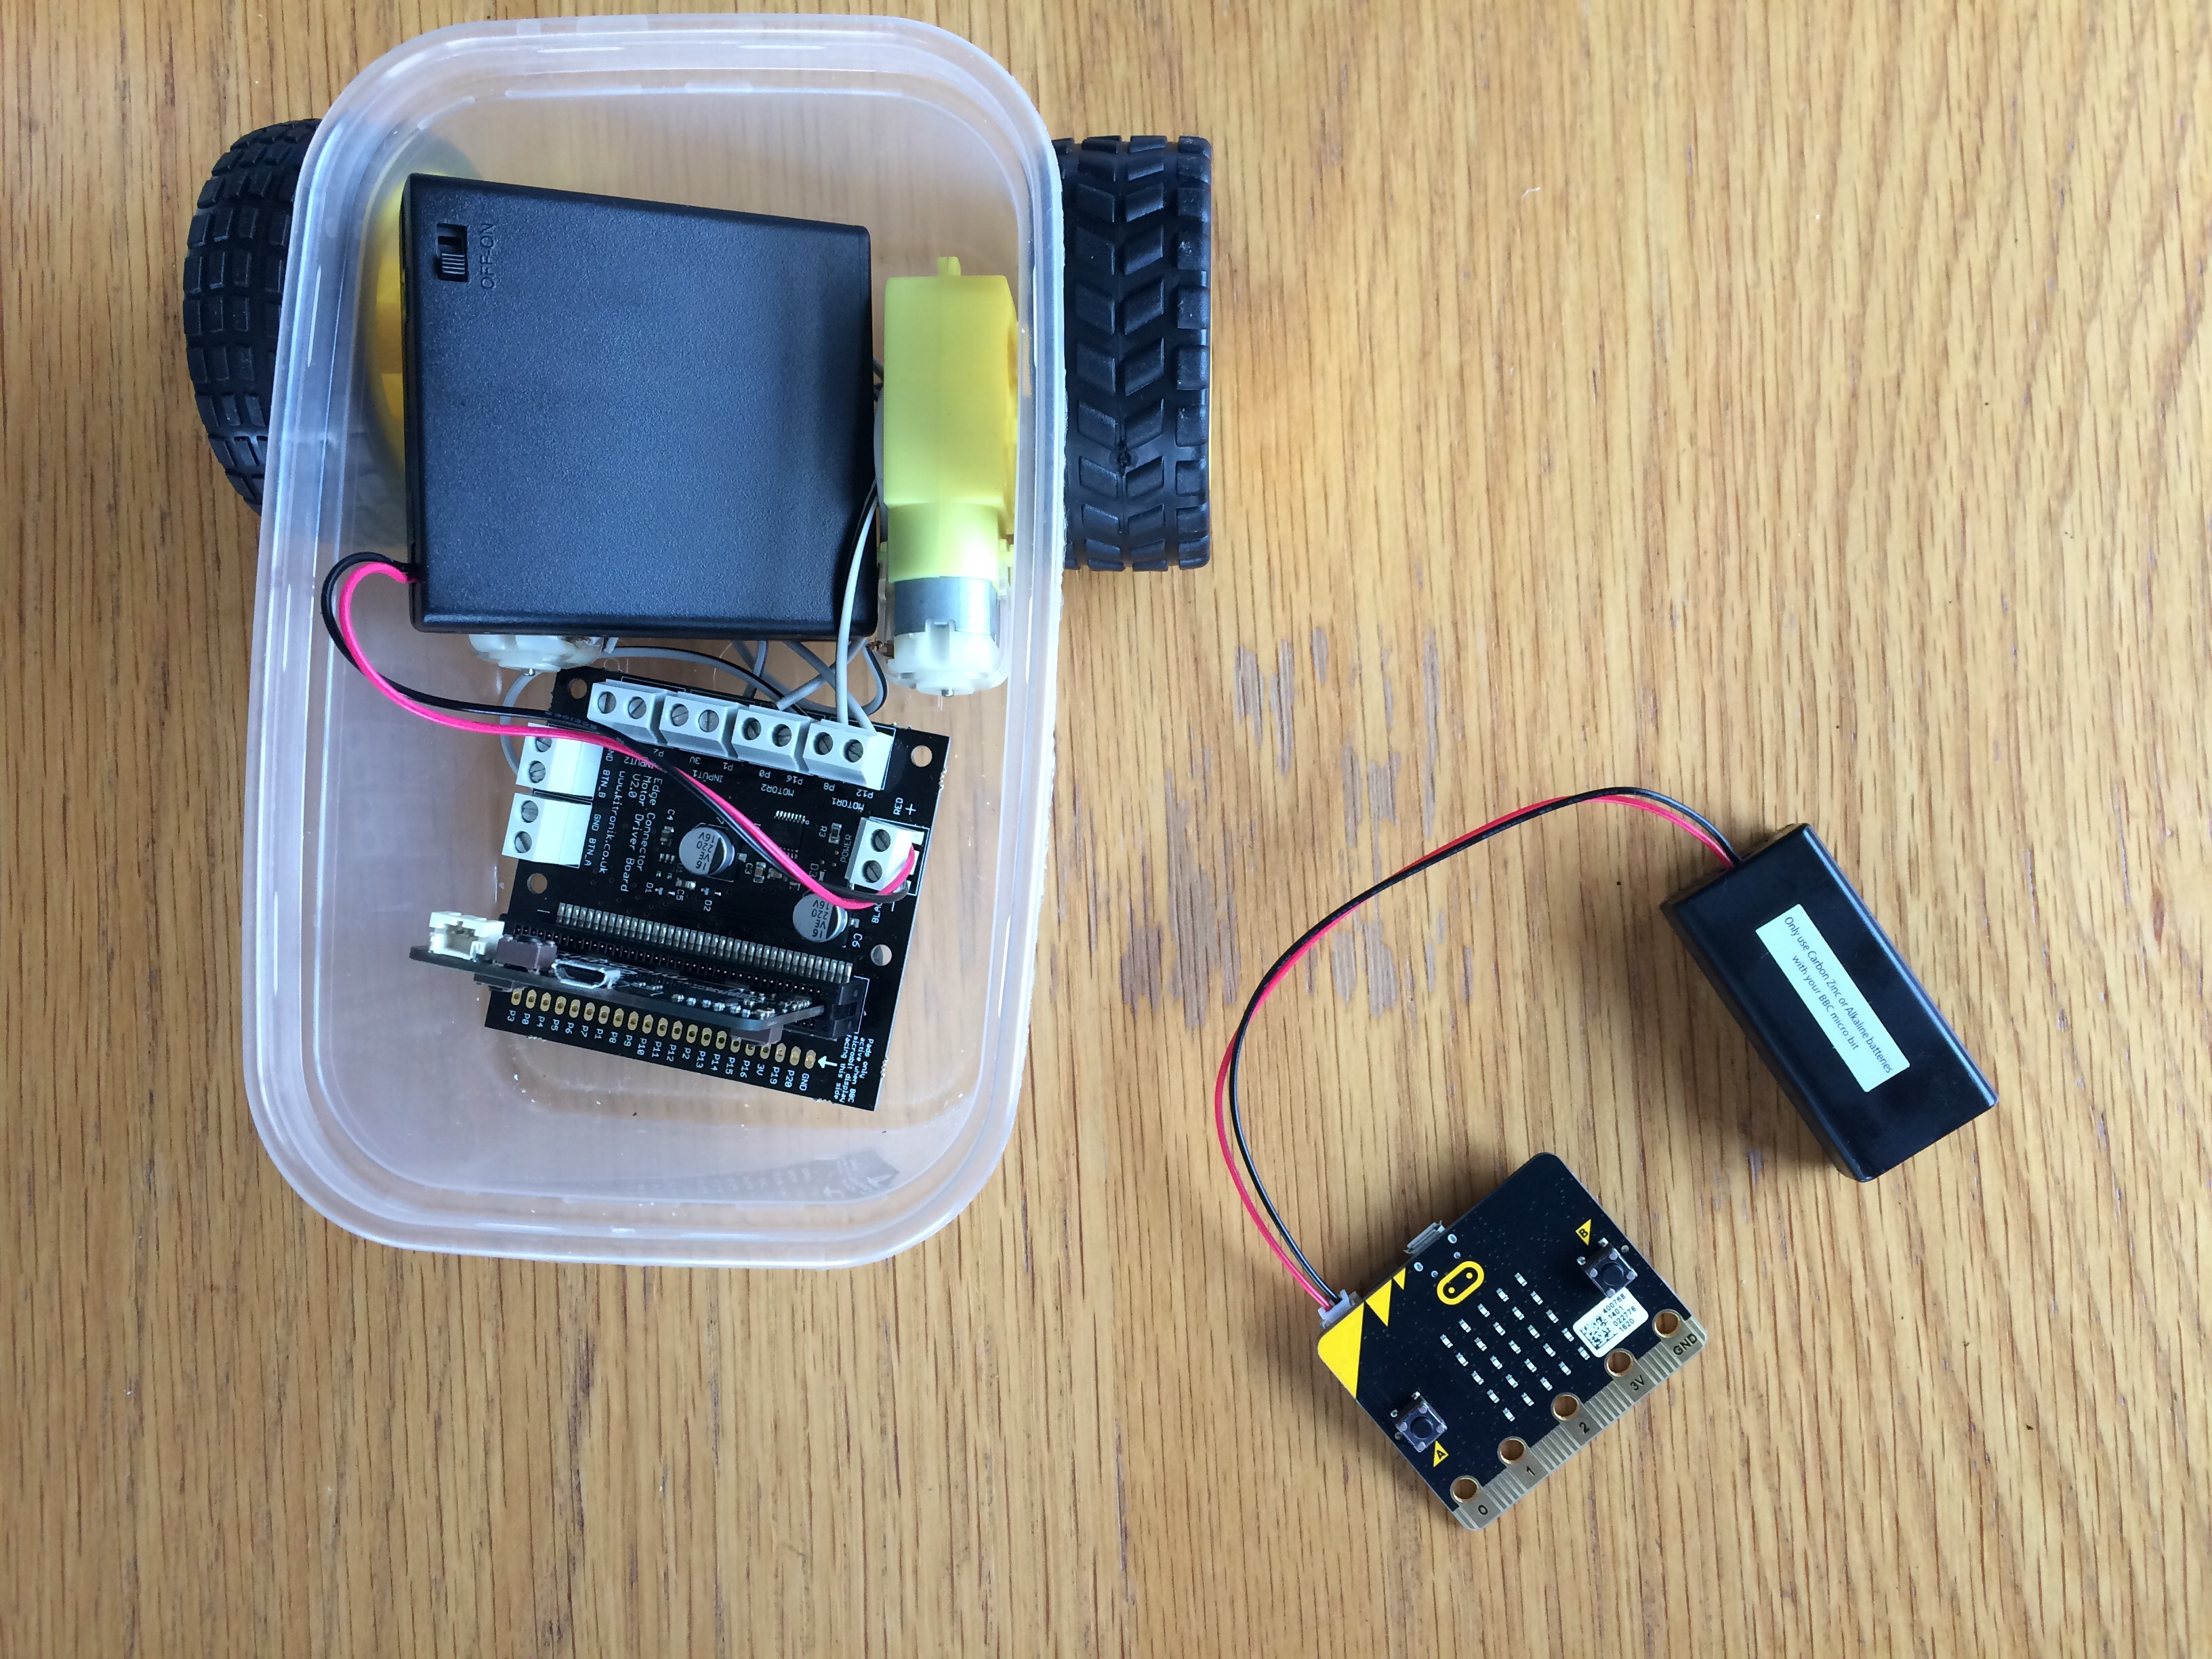
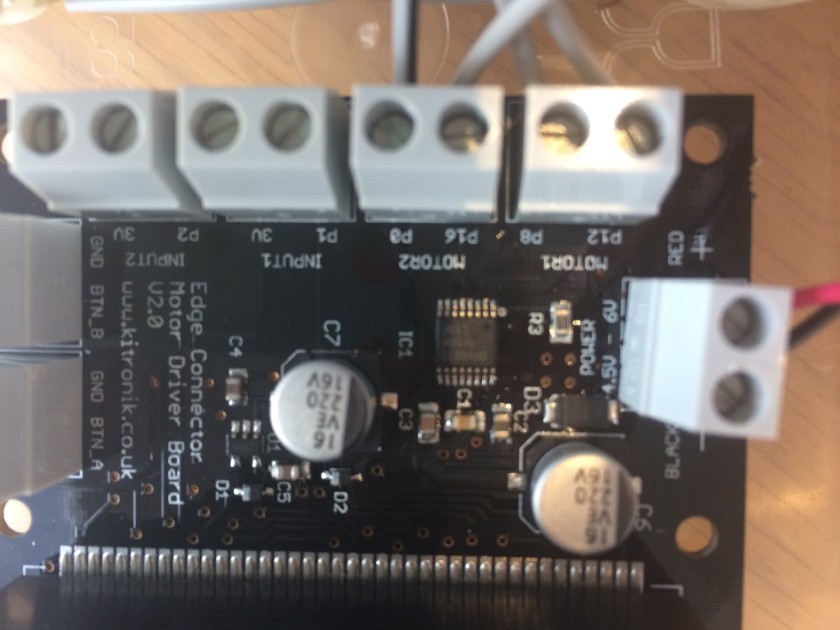
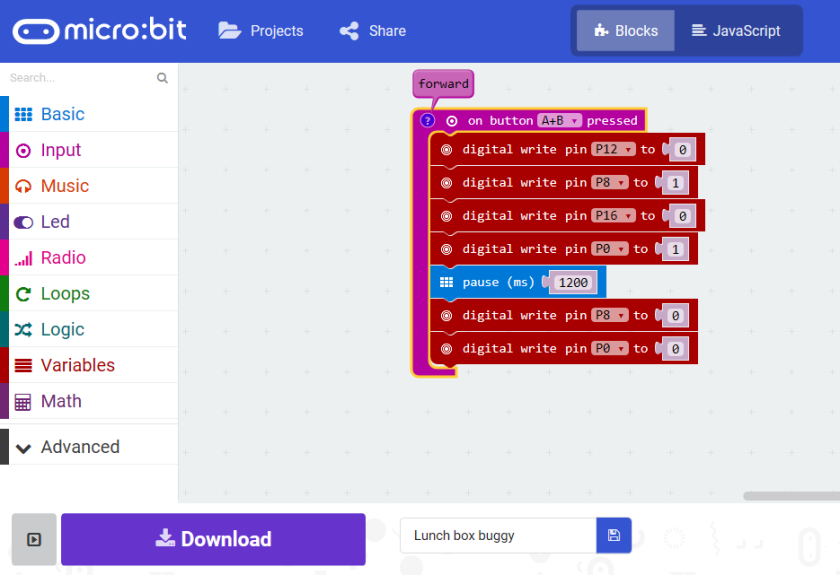
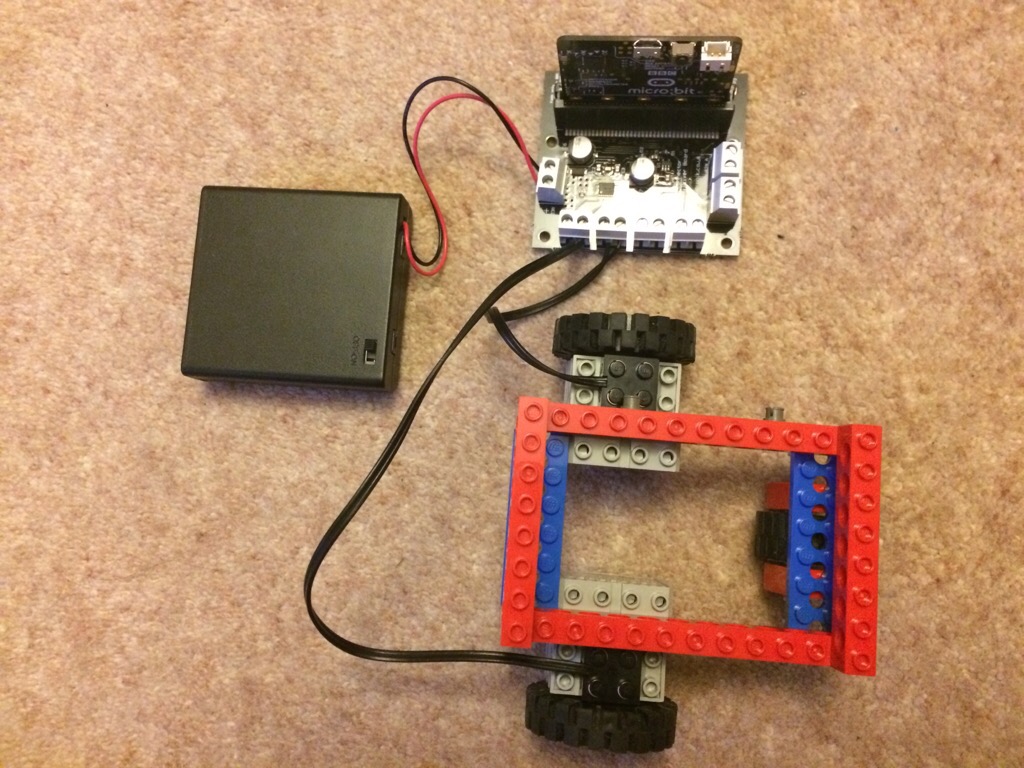
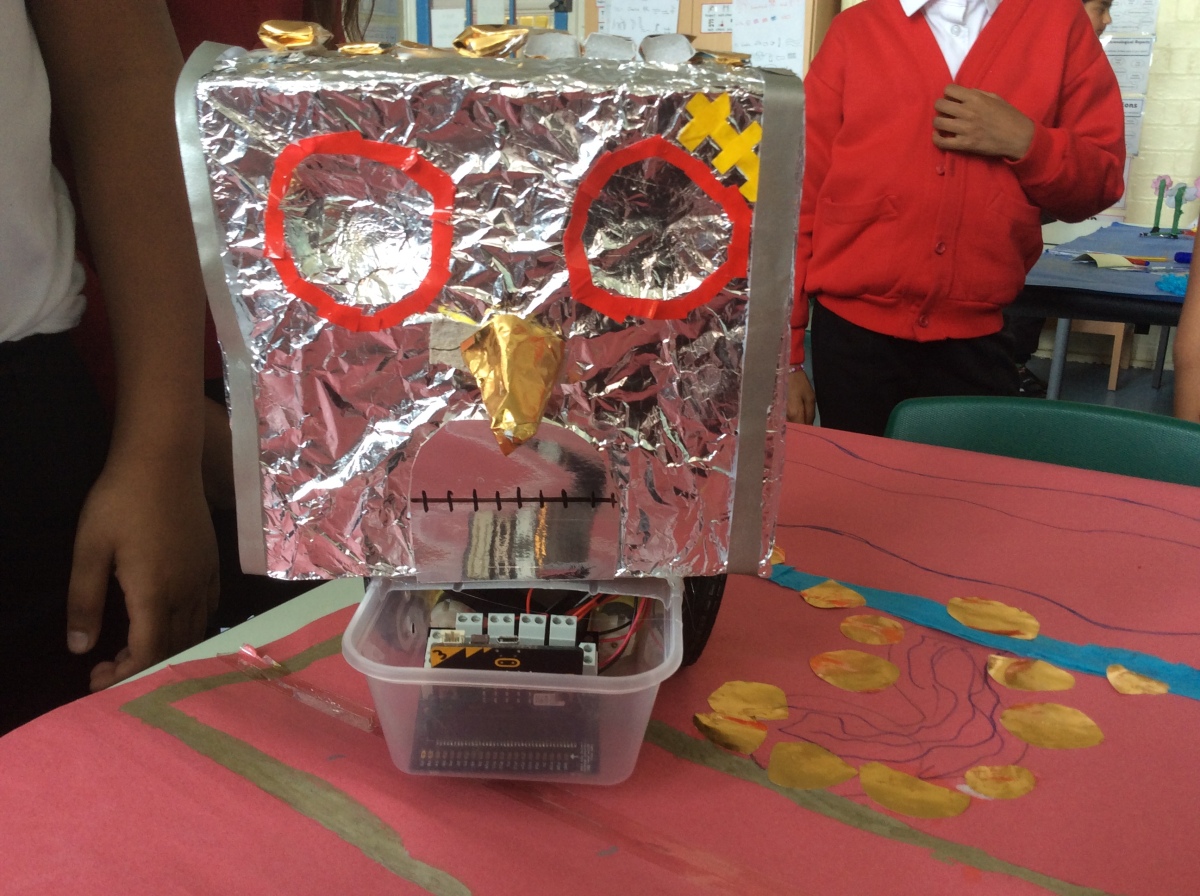
The children were given a microbit with the code for making the buggy move forward by about 30 cm when buttons A+B were pressed. This helped to identify any faulting wiring, problems with batteries before moving on to more complex coding.

We then allowed the children to tinker with this code to create the code for a left turn when button A was pressed, and a right turn when button B was pressed. Children quickly understood how to make the buggies move a shorter or longer distance by altering the code for moving forward, however, tinkering to create the turns was much more challenging and took some modelling and support from the me and the class teacher.

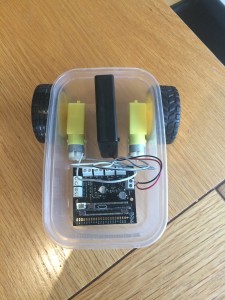
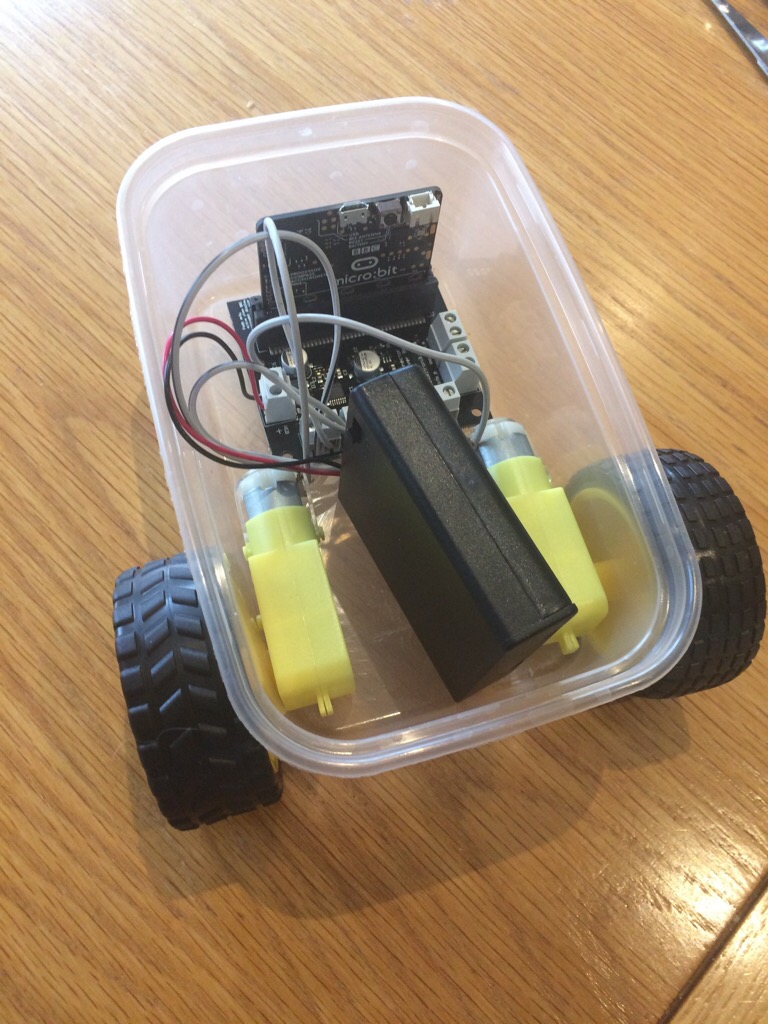
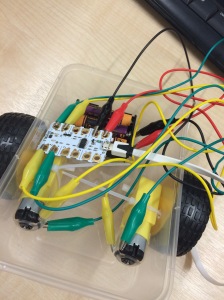
Finally, we glued the Iron Many body parts to the lunchbox lids (which had been cut down so that the children could reach the buttons on the microbits!) and set them off on the maps to meet up in the middle. All the children were successful in getting their Iron Man body part to move, some made them turn and others had a combination of turns and moving forwards to reach the centre.

The atmosphere in the classroom all day was amazing, the children were buzzing and engaged and despite many difficulties (with motors, wiring, wheels sticking on the lunch box lids, batteries inserted the wrong way round, coding errors to name a few!) they persevered and work together to have some success.


Using a second Microbit as a remote control for the lunch box buggy

A second Microbit to use as a radio control for the buggy.

On Friday, a very large box of Microbits arrived from Kitronik (via BCS who are distributing the Microbits for our CAS project). So I finally had a second Microbit to try out.

First boot

The first Microbit I had was a gift from Yvonne Walker at CAS, so I hadn’t one fresh out of the packet before. I was delighted to discover that once the supplied power pack was attached, the Microbit booted and ran an introductory code. The microbit ‘introduces’ itself and walks you through using the buttons and accelerometer (see Intro to the Microbit from Tech will save us). I will be able to use this for our first lesson using the Microbit, once we have also looked at the safety leaflet and thought about how to handle them safely. (You can re-instate the start-up code from the copy on Tech will save us).

Programming the remote control


Tech will save us has a nice tutorial and code to make a remote control for their buggy. I adapted this code as I had used a different command to control the motors. The remote control Microbit now uses the accelerometer to move the buggy forwards and backwards, pressing button A makes the buggy turn clockwise and button B makes it turn anticlockwise, pressing A+B stops the buggy. The code could do with  some refinements as at the moment, it is a two man job to turn the buggy off! Holding down A+B continuously stops the buggy still, whilst someone else switches the power pack off. I’ve also lost the granularity of control I had before, so that going forwards and back for a set time, and turning clockwise and anticlockwise for a set time to effectively turn 90 degrees has been lost within the forever loop.  So, any suggestions on how I can get that control back and/or how I can make A+B stop the buggy by one press would be really helpful! The code I have so far is shared below (for the PXT block editor).

Microbit lunch box buggy coding

IMG_4973
lunch box buggy

We are building lunch box buggies controlled by Microbits as part of a CAS project. So far, I’ve built two versions of the buggy (one in Lego and one using Kitronik kit) and quickly written some very simple code to make it move forward.

I wanted to have some basic sections of code that our children could tinker with and then put together in a sequence to navigate the buggy around a given course.

As I understand it, the motor board has four pins that between them can control 2 motors. There are two wires from one motor to the motor board that connect to two pins (i.e.: motor 1 uses PIN12 and PIN8 and motor 2 uses PIN16 and PIN0).

IMG_4975
motor boards and pins
Using the command ‘digital write pin12 to 1’ turns the electricity on to pin12 (on motor 1) and ‘digital write pin12 to 0’ turns the electricity off to pin12. So going forward when both button A+B are pressed looks like this:

forward

After some tinkering and with lots of help from my beloved Husband (who knows his way round Linux and other command line code) and the lovely Lorraine Underwood, we found we could add a comment to label this section of code as ‘forward’ (go to the JavaScript and add a line at the top with ‘// forward’, then back into blocks and the little blue question mark at the top left appears with a comment. We then worked out that by having one motor run forwards the other run backwards, we could turn the buggy in a circle. The tricky part was working how to make it stop, however, once we worked out that once a pin was turned on, it didn’t turn off until set back to 0, we realised that adding a pause then setting the pin back to 0 would run the motor for a set amount of time. After that it was a case of trying different amounts of time to get a quarter turn. Eventually we discovered 1200 ms was about the right amount of time!

I’ve tried the buggy on a few different surfaces at home as the wheels seem to slip sometimes, and the shape of the lunchbox, with slightly sloping sides causes the wheels to be a slight angle. All of this can make the turns slightly more or less than the 90 degree turn I want, but this is something we can debug with code and with the mechanical aspects with the children once we have the final buggies made.

The code I’ve written so far is published online in the PXT editor. Button A turns right (clockwise), Button B turns left (anticlockwise) and A+B makes the buggy go forward.


Reviving our Lego Mindstorms with Microbits

Using Microbit with Lego Mindstorms technic Lego in primary computing.

Like many schools we have equipment that was bought, well used by a couple of teachers and then they left, the focus on the curriculum changed and the equipment began to languish unloved and gather dust in a corner. We have several sets of Amusement Park Lego Mindstorms For schools (RCX1.0 controller, set number 9725) that haven’t been out of the box in at least the last three years (though the dust on the top of the boxes suggested and the fact that the sets were first released in 1998 leads me to suspect it may have been much longer!). 


Whilst the Robolab software and the drivers can be made to work with Windows 10 (the original requirements were for Windows 95 – bless), I felt it was time to try something different. 

As part of a CAS cross-curricular project to use Microbits with our year 4 children, we are building lunchbox buggies. We have some kit to build buggies but in an effort to give as many children as possible a hands-on experience, whilst not spending any money, I turned to our old Lego kits. 

The Lego motors are more powerful than the hobby motors we used from our buggy kit, but I kept the power pack (4×1.5V AA batteries) and the motorboard the same and hoped for the best! 


I cut off one end of the Lego wire connectors, split and stripped back the wires and connected them to the motorboard. 


I built a very simple frame and balanced the board, Microbit and power pack on top and switched it on and to my delight it worked!


So we will be sacrificing a set of Lego connectors but gaining a new set of resources at no cost to make more buggies. This will also allow us to offer two different ways of building buggies. Whilst the Lego one is perhaps more familiar, building the frame will be more of a challenge than using the lunch box and there is more physical dexterity and care needed to attach the wires to the motors when not using the Lego connectors. 

So if you have some old technical Lego gathering dust dig it out and give it a go!

Micro:bit lunch box buggy

My first attempt at building a simple buggy controlled by a microbit.

Next term at Rushey Mead Primary, we are trialing the Primary CAS Hub Micro Bit Project.

Aim of the project

The DfE has identified a number of ‘opportunity areas’ DfE announcement areas where there is an opportunity to create more computing support for teachers in deprived areas. This project aims to create a programme of support for primary schools in those areas (or in other areas that are classed as being deprived) focusing on a cross-curricular scheme of work which embeds the development of pupil’s computational thinking skills and which uses the micro bit with the aim of enhancing learning and motivation in KS2 pupils.

The project aims to enable a CAS Hub to provide the teachers in the project schools with the resources, skills and knowledge to confidently teach their pupils using the scheme of work and to provide ongoing support in terms of evaluating the effectiveness of the teaching and learning and to produce a case study that exemplifies the impact of project. Hubs that are able to find 2 or 3 schools that are in deprived areas and who are willing to get involved in running this project will be entitled to a free class set of micro bits, as will their project schools. These Micro Bits have been kindly sponsored by the Micro Bit

The resource pack on the CAS teacher resources site (free sign up required) includes a cross-curricular SOW based on the Ted Hughes Iron Man novel and involves the pupils building their own Iron Man model (D&T) and a micro bit controlled buggy (CS) and using their creation to retell an aspect of the Iron Man story (IT).

Building the buggy

img_3523-1
Nic Hughes’ Crumble controlled lunch-box buggy
The heart of the project is to make some simple buggy robots controlled by a microbit. Inspired by Nic Hughes’  Crumble buggy that I built in his CAS Annual conference workshop in 2016, (full instructions on his workshop slides) shown on the right, I thought we could make something similar using a microbit to control the buggy.
Kitronik have very kindly got the project started by sending us enough kit to make 7 buggies and we will have microbits provided by the Microbit foundation. So it was my job in the holidays to check that this would actually work!


Building the buggy was straight forward, though I made a list of helpful tips to remind me of things I will need to sort when scaling this up at school with our children:

  1. We need a supply of wire to connect motors to motor board and a system to either pre-strip the wires for the children, or a handy teaching assistant dedicated to the job in class! Attaching the wires to the motors is fiddly and it may be easier to solder them on.
  2. When we punched holes in the lunch box, the instructions recommended using an electric drill, we thought a bradawl might work but it split the plastic, so resorted to hot wire instead. Again, this will need to be done ahead of time or supervised in the classroom.
  3. It took my husband quite a while to find an appropriate slot head screw driver with parallel sides and very narrow head (3 mm) that would fit the very small screws in the connectors that hold the wires from the motor and batter packs in place on the motor board. We will need a good supply of these in the classroom!
  4. Double-sided tape to stick the ball caster to the underside of the buggy worked really well.
  5. The lunch box itself needs to be big enough for the wheels to clear the rim of the box – ours *just* made it!

Coding the microbit

The next step was getting the motors working. With some help from the wonderful Lorraine Underwood who managed via twitter to point me in the right direction whilst marooned in her car with a sleeping toddler, I succeeded in getting both motors working so the buggy can move forward.

What had perplexed me initially was that the microbit looks to have 4 main pins (the large gold ‘holes’), however, there are in fact 16 pins that can be addressed and when the microbit is popped into the motor driver board it all looks a bit more complicated! Looking closely at the motor driver board, you can see that pins P12 and P8 control Motor 1 and P6 and P0 control Motor 2. I also needed to know the right block to use – under the ‘device’ or ‘pins’ blocks – ‘digital write (0,1)’.

This slideshow requires JavaScript.

Finally, on Lorraine’s recommendation (and to see if I could transfer what I’d learnt in one coding environment to another one), I wrote the code again in the JavaScript blocks  PXT editor.  My very simple code (shown right)

lunchbox code forward simple
link to the code
to make the buggy move forward simply gives power to the motors when the batter pack is turned on.


The next steps will be to make the buggy turn left or right and to add some degree of control over it, perhaps by using the buttons.


CAS North Leicester Primary Hub meeting 28 September 2016 eSafety

Penny Patterson shares her wisdom on how to ensure your school meets the new Safeguarding requirement for online safety.

This term we decided to focus on something that many schools will be covering at this time of year, eSafety. The changes to Keeping Children Safe in Education that came into force on 5 September 2016 included more explicit duties for safeguarding with regard to online activities. We were very fortunate to have Penny Patterson (Senior Inspector Quality Assurance with responsibility for Safeguarding, Havering School Improvement Service) present by Skype for our meeting. She went well beyond the call of duty, when after discovering the M25 was closed, she had to divert and deliver the presentation using her phone from her car whilst parked at a garden centre!

Her slides highlight the new requirements succinctly and she has kindly agreed to share them:

penny-slide1
Full presentation available for download


Safeguarding-and-online-safety ppt file

One of the more alarming aspects of her talk was a discussion around sexting, which most of us had felt wouldn’t be an issue we would need to deal with in Primary schools. However, Penny has dealt with two cases involving children in early years and warned us to be aware of the difficulties of dealing with such cases. Unfortunately the strict legal definition of sexting includes the taking and sharing of indecent images, and if children take photographs of what is under their clothes, this can constitute sexting. Fortunately, UKIS have issued guidance on how to proceed if this happens in your school, and how it can be dealt with in a sensible and proportionate way.

Teachers were keen to know how to deal with parents on social media who were not being good role models to their children. Penny advised that they should consider if the children were involved, named or harmed by the online conversations and if they were, then to deal with this as we would with any other safeguarding incident.

We noted with interest the addition of a category of abuse of neglect for parents whose excessive use electronic devices as ‘babysitters’ and for parents who may be ignoring a child through the excessive use of technology themselves (watching their phone instead of their child crossing the road for example).

Finally, Penny gave us some good advice to make sure that we had checked that the filtering and monitoring systems we were using fulfilled the criteria recommended by the DfE (see : Guide for education settings and filtering providers about establishing ‘appropriate levels’ of filtering and monitoring)

The next meetings of the CAS North Leicester Primary hub will take place in March and May 2017. Book your free tickets online.

CAS Leicester North Primary hub meeting

Following the great success of our launch meeting in November 2014, I’m delighted to announce that our next CAS hub meeting will take place on Tuesday 24 March 2015.

Sign up for free tickets on eventbrite.

Rushey Mead Primary School, Leicester

Tuesday 24 March 2015  16.00 – 17.30

Programme

16.00 – 16.10  Introduction and Welcome – Jo Badge.

16.10 – 16.30 Barefoot computing – Zoe Ross. How to use the resources available on the Barefoot project website to teaching the new computing curriculum in KS1 and KS2.

16.30 – 16.45 What will children be learning at KS3? Dave Abbott, Stonehill High School, Birstall. Dave will show us what children will be doing in years 7 – 9.

16.45 – 17.20 Schemes of work – led by Jo Badge. Bring your scheme of work so far, discuss with colleagues and evaluate where to go next.

17.20 – 1730 Evaluation and future CPD

I hope you can join us!

CAS Leicester North Primary hub launch meeting

I am delighted to announce that, along with my Head Teacher, Debra Bailey, I will be leading a new primary focussed CAS hub in Leicester. Computing At School
(CAS)
is a great organisation that aims to promote the teaching of computer science at school. Membership of CAS is open to everyone, and is very broad, including teachers, parents, governors, exam boards, industry, professional societies, and universities.

A CAS hub is a meeting of teachers and lecturers who wish to share their ideas for developing the teaching of computing in their schools, their classrooms and their community.  It is a meeting of like-minded professionals with the general objective of supporting each other and the specific aim of providing (at least) one idea that can be taken and tried in the classroom. These meetings provide:

  • the opportunity for teachers to meet in a relaxed and informal atmosphere
  • to share ideas and resources
  • to receive training, and
  • to gain mutual support from discussing teaching methods with colleagues.

The launch of the CAS Leicester North Primary hub will take place on Wednesday 26 November 2014, from 16:00 – 17:30 at Rushey Mead Primary School, Leicester. The event is free and all you need to do is sign up online for a ticket. We are very excited to have one of the best Primary CAS Master Teachers of Computing , Phil Bagge, giving a presentation by Skype. Phil is a fantastic teacher of computing and delivers inspiring training on Scratch and other areas of the computing curriculum. I attended one of his Scratch courses recently, and was really impressed by the way he made sure that we knew the common misconceptions children could have and how we could deal with them in our teaching. His massive range and depth of experience in teaching computing lessons really shines through. His resources are all available online and provide an excellent way into teaching the computing curriculum with confidence.

CAS Leicester North Primary hub launch meeting programme

16.00 – 16.15  Introduction and Welcome – What is CAS? Why you should join us?

16.15 – 16.45 “How searching the Internet is just like asking your mum where you left something.” – Phil Bagge, CAS regional coordinator, has a strange but remarkably accurate approach to explaining to primary pupils how web searches work. Will your searching experience be the same after his talk?

16.45 – 17.00 refreshments

17.00 – 17.20 Where does the Internet come from?  a practical hands-on activity to use children to demonstrate how the Internet works by Jo Badge, Computing Lead Teacher, Rushey Mead Primary School.

17.20 – 1730 Evaluation and future CPD

This will be a great opportunity to meet other primary teachers and computing subject leaders locally and share some of the ways that we are beginning to implement the new computing curriculum (there will be tea, coffee, biscuits and hopefully cake on offer too!). I hope you will be able to join us!

Online registration for the launch meeting is now open (and it’s free!).